
STORYBOARD AND ANIMATIC
For the storyboard and animatic task we needed to draw out the the storyboard by pencil and we would use this as a template for our horror trailer. This will allow us to have a guideline of every aspect our trailer. We will display the sounds, the camera movement/angle and editing techniques for each shot.

Shot 1: Establishing Shot, Slow sound and High pitched sounds
Shot 2: Low Angle, Slow sound and high pitched sounds Shot 3: Long shot, slow sound, paning and high pitched sound. 
Shot 9: Low angle, zoom, fades to black and fast sound.
Shot 10: Mid shot, fades to black, fast sound then silence. Shot 11: Close up, zoom and dialogue. |

Shot 4: Mid shot, slow sound and high pitched sounds
Shot 5: Fades to black, over the shoulder, silence then dialogue Production team logo: Iconic theme tune and zoom. 
Shot 12: Long take and dialogue
Shot 13: Quick cut, high pitched sound, tracking and dialogue Shot 14: Zoom, dialogue, fast sound and quick cut |

Shot 6: Long take, tracking and high pitched.
Shot 7: Birds eye view, fades to black and heartbeat rhythm Shot 8: Fast sound, high pitched sound and tracking. 
Shot 15: Tracking, quick cut, dialogue and fast sound
Shot 16: Low angle, Panning, high pitched sound. and quick cut Caption 1: Quick cut and high pitched sound. |

|

|

|
|
Shot 17: Flashes to black and iconic theme tune
Caption 2: Iconic theme tunes Shot 18: Birds eye view, quick cut, iconic theme tune, zoom and high pitched sound. |
Caption 3: Quick cut and high pitched sound
Shot 19: Panning and dialogue Title: Iconic theme tune and long take |
Shot 20: Close up and dialogue
Credits: High pitched sound and long take |
Photo Storyboard
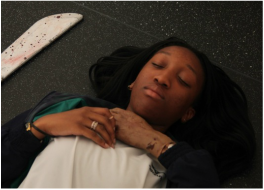
In addition to drawing the storyboard I took photos of each shot aswell. This allowed me to work on the camera angles for the shots. This also gave us a better visual of our trailer when compared to a drawing. It would allow us to practice using the camera and understanding how it would be when filming our trailer.
|
Shot 1

Shot 4

Shot 6

Shot 9

Shot 12

Shot 15

Shot 17

Caption 3

Shot 20

|
Shot 2

Shot 5

Shot 7

Shot 10

Shot 13

Shot 16

Caption 2

Shot 19

Credits

|
Shot 3


Shot 14

Caption 1

Shot 18
Title

|


|
Below is the trailer Wolf Creek 2 and we decided that this is the trailer we would base the animatic on. We chose to use this as my trailer shot template because of the timing of the shots and the type of sounds used in the trailer. We really liked the variation in fast and slow music in the trailer and also the use of black screens in it, Therefore this made us select it as the trailer shot template.
|
Below is the template we created which we used as a template for our horror trailer. We based it on the trailer The Wolf Creek 2. By creating this it allowed us to visualize where our shots will be and how long they will show for.
|
|
Below is the animatic we created using Abode Premier CS6. The animatic will be used as a template for our horror trailer. We used the film trailer above the create the animatic based on its camera, editing and sound technique.
|
After completing the drawn storyboard animatic we went on to use our photos of our shots and created a second animatic. This gave us a better insight of what our trailer would actually look like.
|
